Installing Stone Veneer: Instruction

Getting started

Congratulations on your decision to enhance the look of your home with Canyon Stone products.

Canyon Stone products are made from a lightweight composite material that replicates the look and texture of natural stone, and offers the benefit of being able to be installed directly to any surface.

Calculating Materials Necessary

If you haven’t already purchased your materials, you may be wondering how much stone will be necessary to complete your project.

  • First measure the square footage of the total area to be covered by stone.
  • If you will be using corners on your project, plan for each linear foot of corner pieces to cover 1/2 square foot of area.
  • Example: if you had a 100 square foot wall with an 8 foot corner, the corner pieces would cover 4 square feet of the wall. So, subtracting 4 from 100, you would need 96 square feet of flat stone to cover the face of the wall, and 8 linear feet of corner pieces.
  • The grouted stone patterns are packaged assuming a 3/4″ grout joint. If your grout joint will be different than this, it may be necessary to order more or less product accordingly.

Tips

Some things to keep in mind before, during and after installing stone veneer.

Keep the Stone Clean During Installation

  • Keep your hands clean while you are installing stone veneer.
  • If you get mortar on the stone, let it dry (like grout) until it becomes firm , then flick it off.
  • If wet cement is smeared on the stone, it leaves a thin film that dulls the stone. Take a sponge and clean water right away and keep washing with clean water until film is all gone.


Salt will Damage the Stone

Do not use salt where it may splash or get on the stone.

Prevent Mud Splashing

Where rainfall may splash mud on the stone, put down hay or straw to prevent mud splashing.

Check Local Building Codes

  • Building codes vary from area to area.
  • The absence or incorrect installation of water proofing, flashings, J-weep, stucco stop, caulking around doors and windows, cant strips, gutter and down spouts may result in water infiltration and cause damage in later years.

DO NOT USE ACID TO CLEAN THE STONE

Tools and materials

For the installalion, we recommend the following tools and materials.

• Hammertools
• Level
• 1 3/4″ Roofing Nails
• Grinder
• Hammer Tacker
• Circular Saw
• Wide Crown Stapler
• Safety Glasses
• Tin Snips
• Dust Mask
• Wheel Barrow
• Grout Bag
• Hoe
• Medium BristledBrush
• Masonry Trowel

It’s not absolutely necessary that you have all of these circular saw tools to use while installing stone veneer,
but they are all avail- able for rent from your local hardware rental shops.

ESTIMATING

getting_start

Installation Details
walls2
walls3
walls4

Sheathing

sheathing

Rigid insulation

rigid_ins

Open stud

open_stud

CMU wall

cmu_wall

Concrete wall

concrete_wall

Tilt-up

tilt_up

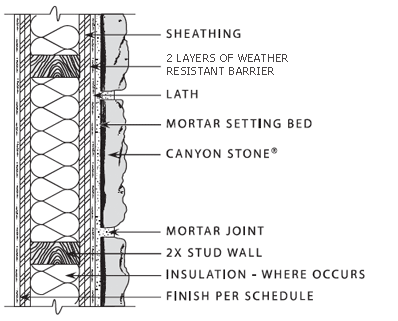
Typical stone veneer application

Stone-Installation-2layer

walls

Quoins

quoins

Step 1: Preparing the surface
surf_prepWater Resistive Barrier (WRB)
If you will be installing stone veneer on an exterior non-masonry surface it is recommended to apply two lay WRB such as a twoply Grade D 60 minute paper. First, install a J-weep 4″ above grade, then apply WRB starting with the bottom edge at the lip of the J-weep continuing upward in a shingle-like fashion . Overlap WRB a minimum of 2″ on horizontal seams and 6″ on the vertical seams.

Wire Lath

  • Directly over WRB, or directly over the sheeting on an interior project, cover the area with wire lath. Caynon Stone recommends using 3.4 Ib sq/yd or 2.5 Ib sq/yd corrosion resistant lath.
  • Install the lath horizontally.
  • Overlap the lath a minimum of 6 inches on the vertical seams, and at least 2 inches on the horizontal seams.

The overlapping lath must begin or end on a framing member.

  • The lath should feel smooth as you run your hand down over the lath and rough as you run your hand up over the lath.
  • Use fasteners (nails, staples, etc) that will penetrate the framing members a minimum of 1 inch.

Fastners to be every 4-6 inches vertically to framing members.

  • When working with corners, fold the lath tightly around the corner. This rule applies for inside corners also; fold the lath at a 90 degree angle and fit it tightly into the corner. See diagram above.
  • Never have a seam on a corner.

It is very important to fasten the lath on both faces of the corner. See diagram above.

Step 2: Mortar Mixture
You will need to mix three separate batches of mortar, one for the scratch coat, one for the setting bed,
and one for the grout. Each requires a specific ratio of sand, mortar, and either portland or masons cement.

Scratch Coat – Type S Pre-Blended Mix Mortar
Setting Bed – Type S Pre-Blended Mix Mortar or Multipurpose Thin Set Mortar for Drystack Installations.
Grout – Type S Pre-Blended Mix Mortar

  • Dry mix the sand and cement together with a hoe in a wheelbarrow or mud box. This will avoid creating clumps in the mixture.
  • Slowly add water to the mixture a little at a time and continue to mix. You can always add more water later, but if you add too much, the mixture will become runny and unusable.
  • Continue mixing the mortar adding small amounts of water as needed until it has the consistency of peanut butter.
  • If using a pre-mixed mortar ensure that it will meet the recipes listed above, pre-mixed mortars generally contain too much sand and not enough cement
Step 3: Scratch Coat
  • Use a masonry trowel to work the mortar into and over the lath.scratch_coat_
    Cover the entire area of lath with the mortar mixture.
  • While the mortar is still slightly wet, use a medium bristled brush to rough up the scratch coat a little. Virtually no mortar should be removed with the brushing process .
  • After the scratch coat has become sufficiently cured to support the application of stone without damage, the stone shall be applied.

Scratch coats that have become dry shall be thoroughly dampened
with water prior to applying the stone. There should be no free water
on the surface when the stone is applied.

Step 4: Applying the Stone
Mix mortar
Mix the setting bed mortar as described in section 2.

Layout the stone
Before you apply any of the stone, layout a couple of boxes in front of your project. This will give you a sense for thevariety of shapes and colors you’ll be working with. Arrange the pieces so they fit and look nice next to each other, and try to avoid clumping colors together all in one area.

Install corners first
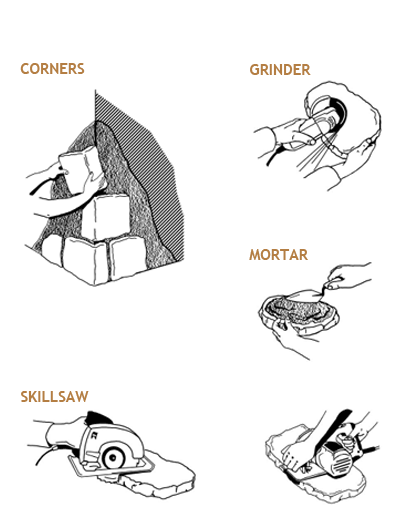
Start at the corners and work toward the center of the wall. Be sure to alternate long and short returns on corner pieces.

Work from the top down
Whenever possible work from the top down to prevent cement from dripping on stones beneath. That is unless you’re working with one of our drystackable patterns, which are designed to be laid from the bottom up.

Groutless patterns or dry-stacked installations
With these patterns, you should work from the bottom up. In these installations the pieces should be placed tightly together. Be sure to check yourwork often with a level. If you’ll be working with a dry stackable pattern, it is recommended that you mix your mortar with a latex bonding agent, available from your supplier. (Verify with Bonding agent manufacturer for proper usage instructions).

Guidelines
With some patterns, it’s a good idea to lightly etch guide lines into the scratch coat, using a 4′ level and a pencil.

Size the stone
It’s always a good idea to size the stone up before you apply any mortar, just to make sure it will fit properly and look good next to the other pieces.

Moisten surfaces
Thoroughly wet the scratch coat/wall surface with water prior to applying setting bed mortar and stone. It may be necessary (i.e. dry, arid conditions) to also wet the back of the stone prior to applying the setting bed to the stone.
apply_s

Apply the stone
The back of each stone should be entirely buttered to a
nominal 3/8″ thickness. Firmly  work the stone onto the scratch coat with a slight back and forth or rotating motion to set the stone, mortar should ooze or squeeze out around the edge of the stone during this process. Once the stone begins to take hold, no further movement should occur. If this happens the bond will be broken. The stone and mortar will need to be removed and the procedure of setting the stone restarted. It may be necessary to remove excess mortar around the stone.

Inside Corners
There are no special pieces for working on inside corners, just meet the two pieces together.

cuttingCutting the stone
Any power saw with a masonry blade will work. This cutting will be very dusty, so be sure to wear safety glasses and a dust mask and do all cutting outdoors. Other times you may want to break the stone to keep a more natural looking rough edge. You can use a nipper to trim small amounts off the stone, or the back of your masonry hammer to crack a piece in half.

Step 5: Applying the Grout
Cut Grout Bag
Cut about a 112″ hole in the tip of your grout bag. It’s best to start by cutting a smaller hole, and you can always cut more later, but if the hole is too big, the cement will drip out and stain the stone.

Using Grout Bag

  • Fill your grout bag about half full with the grout mixture
  • Twist the top end of the bag and squirt some grout back into the bucket. This will prevent air pockets from causing the grout to accidentally squirt out explosively.
  • Keeping the top end of the bag twisted, gently squeeze the grout into the joints. Fill all the gaps between the stones with grout mortar to slightly above the desired finish depth. The grout will tighten and seal up the area around the stone.

Letting the grout dry
Let the grout dry until it is firm but not solid. You want to be able to push on it without leaving fingerprints, but don’t let the grout turn gray or it will be very difficult to strike.

Striking the Grout

  • Striking the grout gives your project a finished look. Strike the grout to achieve the desired look. Use your striking stick to scrape along the joints until the grout has a clean , even look to it.
  • We recommend using a hardwood stick such as oak for striking. Keep the sticks square by cutting the tops off of them if they get worn down.
  • The grout should crumble away like sand. If it smears, or crumbles away in large chunks, that means the grout is still too wet.

Sweeping the Stone
Finally, use your medium bristled brush to sweep the dust off the stone.

Installing Stone Veneer: Videos

visualizer2

Become a dealer

If you are interested in adding to your existing line of products, Canyon Stone Canada offers dealership programs that fit all retailers – from small building material stores to highly specialized masonry companies.

REQUEST A FREE CATALOGUE